Showing posts with label tutorial. Show all posts

Sunday

STROBIST ARCHIVE: LESSON #5 - SUPER CLAMPS

Taken Directly from


While stands are usually the best choice, they aren't the only way to hold a light in a specific location. And other options take up less room in a lighting kit, too.

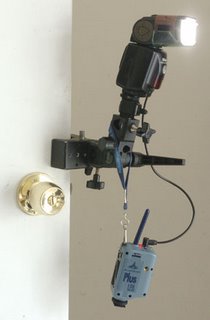
The favorite of most shooters is the Bogen Super Clamp. It can latch onto just about anything, provided the thickness is a couple inches or less. 

The bent arms of the clamping jaws make it particularly appropriate for clamping onto a variety of shapes. Pipes, railing, doors, shelves, tables, tree branches, electrical conduit running up the wall in a high school gym (not too tight...) are all no problem.

It comes with a stud that will accept a ball head or an umbrella stand adapter, too. So mounting your light is very easy. They are about $28.00, and every photographer should have at least one. 

Wednesday

STROBIST ARCHIVE: LESSON #4 LIGHT STANDS

Taken directly from


Now that you have decided to get the flash off of the camera, you'll need some place to put it. And for most situations the best choice will be to attach it to a light stand. 


Most any light stand will safely support a shoe-mount strobe. So look for a stand that that is reasonably priced, can stand up to some abuse and is light and easily transportable. 

Two of my favorites are the Bogen 6' Retractable 5-Section Light Stand (3373) and the Bogen 8' Compact Light Stand. The 3373 has been discontinued for another model. It is now sold as a Manfrotto Nano 001 (~$58.00). 

There is an off-brand 5-section compact stand that is very similar (and a little more heavy duty, actually) for $39.99. It is called aLumoPro 604. For all practical purposes, the two are exchangeable. 

If you are not going to put a stand through a hard duty cycle, there is no reason to spend a lot of money. Stands are notin the optical chain. They hold up the flash -- and a very small flash if you are using speedlights.

The 5-section compact stands are my workhorse (I use two of them regularly) because they fold up to a very compact package and will support a shoe-mount strobe just fine. But if you are looking to get a little extra height and are willing to forego the ultra-compact folding advantages of the compact stands, you have many good choices to suit just about any budget. 

The second example, for instance, is a sturdier, taller, general purpose stand will double as a support for larger strobes when I need it, but does not fold as compactly because it has only three sections. There are plenty of good choices. But if you are shopping price, make sure the stand is a full-sized version, and not just a short "background" stand, though.
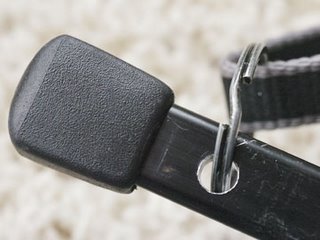
Besides extreme portability, another reason that I like the 5-section stands is that they use solid aluminum legs to save space. This means that they can be easily drilled (1/4" hole works fine - see detail photo) to take an O-ring so you can attach a strap. This is a great setup, as it allows you to just throw the stand over your shoulder as easily as carrying another camera body.

You can easily attach a strap to a tubular-legged light stand, too. Just use a little gaffer's tale and 3 or 4 inches of a straight section of clothes hanger wire with a little "bump-out" bent into the middle of it. Use needle-nosed pliers and gaffer tape the straight parts to the stand legs. Hook the O-rings to the middle parts. 

One advantage of stands other than the 3373 is that it gives you more choices on the umbrella, which we will talk about later. The 5-section, small-folding stands are pretty close to the same size of the double-fold umbrellas. But if you get a normal-sized stand, you have a much wider choice of umbrellas to choose from. 

(It would make very little sense to get a compact-folding stand and bungee it to a full-sized umbrella, or vice versa.)

Whichever way you go, either version will be very functional. The 3373's and double-fold umbrellas can be annoyingly difficult to find in stock, as you pretty much have only one model number to choose from for each. But if you do not need that N-th degree of portability, the normal stands and umbrellas will give you a more sturdy support and light softener for less money.

Sunday

STROBIST ARCHIVE: LESSON 2 - TRAVELLING LIGHT

Taken directly from the Strobist Archive-

Everyone is different with respect to the gear they choose to take a given assignment. But a news photographer typically carries two digital bodies, one with a fast wide zoom and another with a fast tele zoom. A Nikon user might have two Nikon D2h's, a 17-35/2.8 and an 80-200/2.8. This gear covers wide to telephoto with the ability to shoot wide open at f/2.8 throughout the range.


Add to that a small waist pack with a strobe and a 50 (either an f/1.4 for speed or a micro depending on the assignment in my case) and you have a very capable setup.

But with the addition of a few small, light items, you can add to it the ability to easily use light off camera on any given assignment.


The idea is to incorporate the gear into your standard setup so you will always have the ability to use better light. The White Lightnings are nice, but they don't do much good from inside the trunk. Or under the bed. If you have the light with you, you'll be more inclined to use it. That is the whole philosophy behind learning to better use the shoe-mount strobes. They are always there. If you get in the habit of using them more effectively, you will always be ready to add light to a situation when you need it.
The first photo (up top) shows the typical two-body, two-zoom setup and small waist pack.

The second shot shows that with the addition of a little bit of gear you have the added ability to use light off camera. You can create hard, soft or bare-tube-style light, with a full beam spread or very tight throw. It can be balanced for flourescent, daylight or tungsten ambient light. The light can be positioned with either a stand or a Super Clamp. Not much difference in weight. Huge difference in ability.

The light stand is a compact, 5-section Bogen 3373, modified (drilled) to have a strap. It is topped by a standard umbrella/stand adapter with a shoe mount. "Ball-Bungeed" to that is a full-size stowaway umbrella that double folds for easy transport. The umbrella is stuffed inside of a homemade folding snoot made out of gaffer's tape and the cardboard from a box of Frosted Flakes.

In the waist pack is a set of Pocket Wizard remotes that will allow me to trigger the strobe wirelessly from up to several hundred feet away. I keep some small items, like a Super Clamp, a Sto-Fen Omni Bounce and some gels there, too. The ball-bungees holding the umbrella to the stand also double as clamps.

I sometimes carry an external high-speed battery for the flash, but only if I am likely to be using the flash above quarter power (or for extended shooting.)

This gear suffices for easily 90% of the assignments I shoot. And I can comfortably walk a couple of miles with it, if need be. I also can easily shoot with either camera with the lighting gear hung from my shoulder.

The sooner you get the "less-is-more" philosophy about how much gear you carry around, the less likely you are to be popping Vioxx for your back and joint pain when you are 40.


Next: Lighting 101 - Light Stands

Monday

STOBIST ARCHIVE: LIGHTING 101 - LESSON 1

Taken directly from the Strobist Archive

To make use of the techniques described in the following lessons, we are going to assume a couple of things:

1) You have a strobe that can be triggered externally via your camera's PC connection, as seen in the first photo. This example is a Nikon SB-28dx, a circa 1999 pro flash. This external capability can be added to any hot-shoe flash for under $20 via a "Universal Translator" adapter. No worries.


2) You have a strobe that can be set to manual power and "dialed down." This is pretty much mandatory. If your flash does not have a variable manual control, you are gonna be one unhappy (and very limited) puppy. Fortunately, most good flashes have this feature. And you can easily find one that has it if you need to get it.

 
Most high-end Nikon flashes, new and old, have PC jacks on them. Sadly, most Canon flashes do not. (Shame on you, Canon.) If you are shooting Nikon, I know the SB-24, -25, -26, -28 series and -800 have both PC syncs and manual control.

 
And the older, used Nikon flashes work equally well with any brand of camera, since you are using them in manual mode and off camera.

The Bad News

 
Unfortunately, and due in no small part to the popularity of this site, prices for the formerly cheap used Nikon flashes have gone nuts. Don't chase them too far, as there is now a perfectly good flash that has been produced specifically in response to input from this site's readership.

 
The Good News

The LumoPro LP160 is a 2nd-generation flash that is specifically designed for off-camera lighting. It is full-range manual speedlight, going down to 1/64th power, swivels and zooms, just like many other flashes. At full power it equals the light output from the $500 Nikon and Canon flagship speedlights.

And it has other goodies, too: It has a very good built-in optical slave, which means it can be triggered by another flash. This is very cool if/when you move into multiple light setups -- which you probably will, eventually.

 
Even better, it not only has a PC jack (which takes expensive sync cords) but also a 1/8" audio-style sync jack. Meaning, it can synched via dirt-cheap audio patch cords. (25-foot sync cord for less than two dollars, anyone?)
 
This is a huge improvement over every single other speedlight to date, with the exception of the discontinued LP120, the 1st version of the flash. It has been dubbed a "quad-sync" flash -- hot shoe, slave, PC and 1/8" jack. It is $159.95 (here) and is a perfect fit for people looking to get started in off-camera lighting. Because of the built-in slave, it is also perfect for adding a light to a pre-existing system, too.

Lastly, there are usually lots of new speedlights popping up out of China on a near-monthly basis. Some of them are cheaper than the LP160, too. But bear in mind that the LP160 is the only flash (as far as I know) which gives you access to the cheap audio sync cords, and it comes with a 2-year warranty. And that last point probably belongs at the very top of the feature list.

 
So, once you have your flash, the question is how to better use it.

Briefly, your decisions are:

• Where am I going to put the light - and why?

• How am I going to get it to stay there?

• How am I going to trigger it?

• What will the quality of the light be: Hard or soft?

• What will the beam spread of the light be - wide, narrow?

• How will I balance the strobe's intensity with the ambient light?

• How will I balance the strobe's color with the ambient light?

There you go. Seven decisions you get to make, with an infinite number of possibilities. And that is just assuming one strobe as a light source. Very soon, most of these variables will get to be instinctive, and you can concentrate on the two or three that will define the quality of light in your photo.

 
Next we will look at a typical photojournalist's core equipment (the gear that goes to most every typical assignment) and how it can be expanded with minimal extra weight, fuss and expense to greatly improve lighting effectiveness.


Next: Traveling Light

Thursday

STROBIST ARCHIVE: LIGHTING 101 - INTRO

DIRECT FROM THE STROBIST ARCHIVE:
LIGHTING 101-INTRO


Intimidated by the idea of off-camera lighting? 


Don't be.

We are pretty much starting from scratch, so no worries. The first posts will be about what kind of gear you will need to do the minimalist strobe thing. 

When we are done having our way with your wallet (remembering that light gives you far more bang-for-the-buck than does fast glass or the latest digital camera or 300/2.8) we'll move into basic technique. And after that, we'll keep it going with periodical essays and ideas on how to improve (or refresh) your lighting ability.

When you've worked your way through the basics of designing your light kit and learning how to use it, make a point to browse some of the examples in the "On Assignment" section. Those will be updated constantly, too. So keep checking back.

You will likely have some questions along the way. Sadly, it is not possible for me to take the time to personally answer all of the one-to-one lighting questions that pop up. So try to resist asking them in the comments section. The only people reading this behind you are the people who are, well, behind you. 

You will find the one-to-one knowledge bank you seek in the Strobist Group on Flickr. There, you can ask away and get the diversity of response that you need. These are the lighting grad students, so to speak. They know this stuff, and are very enthusiastic about sharing their knowledge. 

But please do your part and be considerate enough to search the Flickr group threads for relevant keywords in your question first. You are probably not the first person to ask. Or the tenth. Just sayin'.

Most of all, remember to have fun and learn to make some cool light.

VISUAL STIMULI: ANDREW ZUCKERMAN

2010/11 Andrew Zuckerman from CreativeMornings on Vimeo.


Check this Creative Mornings talk with famed photog Andrew Zuckerman
45 minutes worth of gold. Seriously.

VERDICT NEWS: WE'VE LINKED UP W/ STROBIST


The Verdict Blog is pleased to announce that we are now linked up with the Strobist !!
 Probably the best 'how to' blog on the whole dang internet, we will feature 'Novice' and 'Advanced' lighting techniques for off camera flash. If we don't post what we need to know, we have a link on the bottom right of our page that will take you to the Strobist directly.  
Learn how to light...